
Introduction
This blog post will detail a Bluetooth Low Energy-based system that serves as the foundation for a scalable centralized wireless system consisting of low-power nodes that gather environmental sensor data.
Traditionally, it has been impossible to design a low-power and scalable system that also allows bidirectional communication between end nodes and a central node using Bluetooth Low Energy (LE). However, this is now possible with the right hardware and by utilizing a relatively new Bluetooth feature called Periodic Advertising with Responses (PAwR).
In this project, we will be using Nordic Semiconductor's popular Bluetooth Low Energy platform (including SDK, hardware, tools, and more!). Specifically, we will be using a few nRF52840 development kits.
System Design and Operation
The example project we’ll design and build is a Bluetooth LE-based Weather Station.
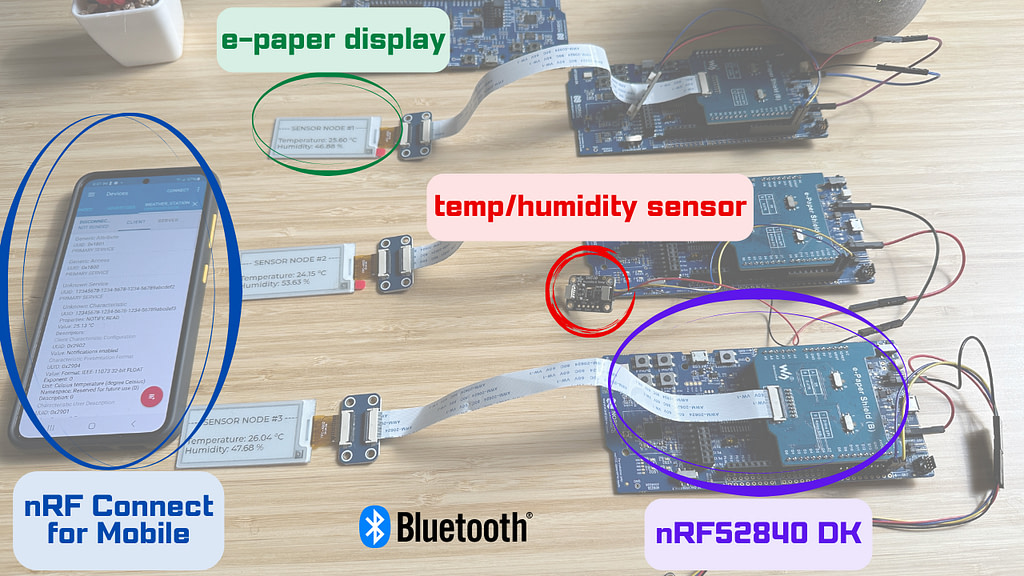
For simplicity, we’ll use a single sensor (on each sensor node) that can read both temperature and humidity.
This can easily be expanded to include more sensors or a different sensor that can read other environmental parameters (e.g., barometric pressure, CO, CO2, gas, etc.).
Below is a diagram that shows the different components of the system:
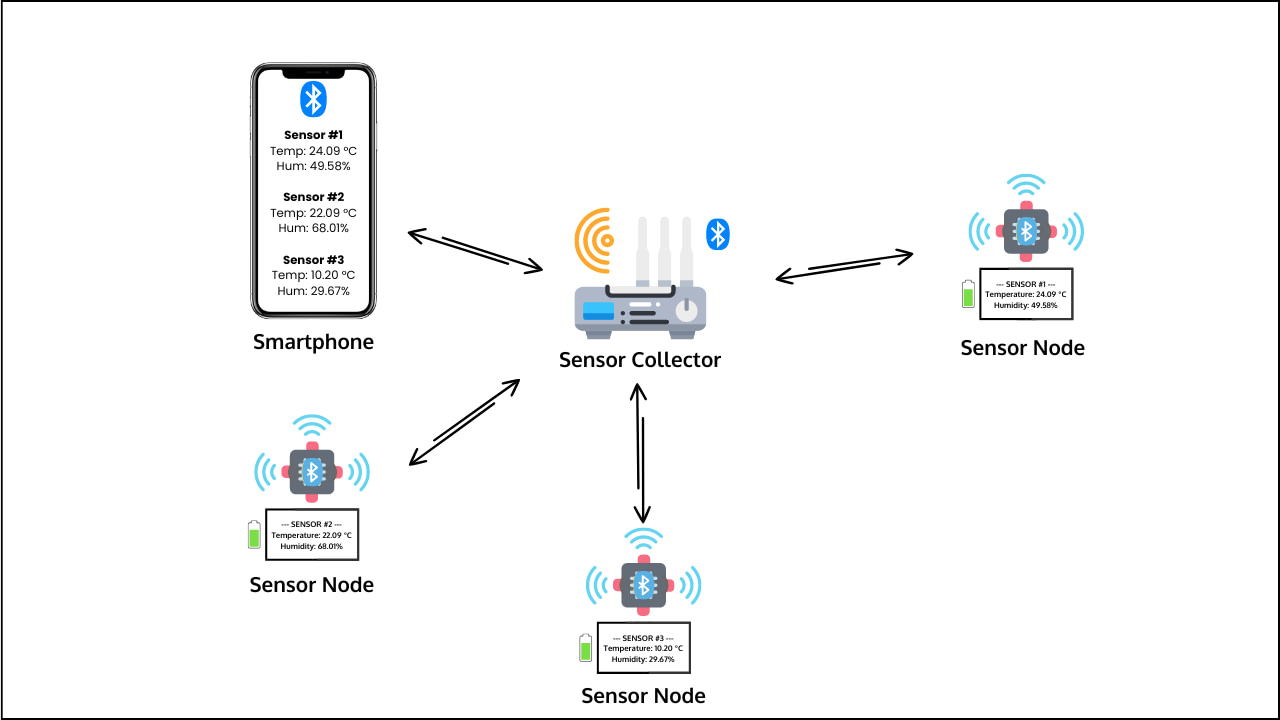
As you can see, our system has three main types of components.
Let’s list each one and describe its role and behavior.
- Sensor Collector:
- The sensor collector will be very simple in terms of hardware components. It will consist of only an nRF52840 DK without peripherals or additional attached components.
- This is the “central” node in the system (not to be confused with the Bluetooth LE central role).
- Instead, this refers to the device acting like a gateway, access point, or hub, meaning the system will not operate without it. The system will be configured in a star topology setup (hub spoke model).
- The sensor collector’s role is to collect data from all the sensors and expose the data to the user(s) via a smartphone interface.
- It acts in three LE roles: the PAwR advertiser (receiving data and sending commands from/to the sensor nodes), LE Central (connecting to the sensor nodes), and LE Peripheral (exposing the sensor data to a smartphone app).
- It will be mains-powered, so no power optimization is needed.
- The sensor collector stores the last received values and exposes them via a GATT Server that can be read by a connected smartphone.
- Sensor Nodes:
- In terms of hardware, each sensor node will be made up of the following:
- nRF52840 DK
- e-Paper display
- A temperature+humidity sensor (the Sensirion SHT40)
- Sensor nodes will act in both LE PAwR synchronized and LE Peripheral roles.
- PAwR allows the sensor nodes to report the sensor data to and receive commands from the sensor collector.
- The LE Peripheral role allows the sensor collector to transfer the periodic advertising sync information to each sensor node (via the Periodic Advertising Sync Transfer procedure).
- This process helps save power on the sensor nodes since they don’t have to go through the process of discovering the PA (Periodic Advertising) train. This might not seem significant, but over time, if the devices repeatedly lose sync and need to re-sync, then power consumption from the PA train discovery process adds up.
- This device will be battery-powered, so we have to optimize its operation for power consumption.
- The e-paper display will be used to report three pieces of information:
- Device ID
- Temperature reading
- Humidity reading
- A sensor node will periodically read both temperature and humidity.
- It will also print those to the local e-paper display.
- A Sensor Node will receive commands from the sensor collector.
- A command will indicate whether it wants to read the temperature or humidity reading.
- The command will apply to all synchronized Sensor Nodes, and they will all report these values back to the sensor collector.
- Each Sensor Node will be assigned an ID at compile-time
- The ID will be included in the advertising data and the responses that are sent back to the sensor collector for identification purposes.
- In terms of hardware, each sensor node will be made up of the following:
- Smartphone:
- To mimic a real-world application, we will design the sensor collector to implement an LE Peripheral.
- This will allow the sensor collector to report the temperature and humidity measurements coming from all the sensor nodes in the system in a unified manner.
- A connected smartphone can read each sensor node’s latest data, including temperature and humidity measurements.
- A connected smartphone can subscribe to notifications of temperature and humidity readings from each sensor node and will know exactly which sensor node the readings come from.
- We’ll use the Nordic nRF Connect for Mobile application to interface (as an LE Central) with the sensor collector.
- It is recommended to use an Android phone for this purpose due to some necessary features not being available in the iOS version of the nRF Connect for Mobile app.
For the purposes of the project implementation in the course, we will be using only three sensor nodes. However, the system design allows us to scale it to potentially thousands of sensor nodes without having to change much in the architecture. This is the power of PAwR!
💡Note: The full implementation of this project is available in a free course here.
Hardware Components
In terms of hardware components, here’s a complete list of what you’ll need to build the whole project:
Software Components
Here’s a list of the various software components used in the project:
- nRF Connect SDK: we’ll start with v2.6.0, but the course will be updated to support newer versions as they get released.
- Visual Studio Code IDE
- nRF Connect for VS Code Extension Pack
- Third-Party Modules
- Various patches that have not been merged into the current SDK version (included in the GitHub repo, linked below)
- nRF Connect for Desktop
- nRF Connect for Mobile
We also have all the source code hosted in a GitHub repo to accompany the course. You can find the repo here.
💡Note: The full implementation of this project is available in a free course here.
Power Consumption Optimization
Achieving low power consumption is crucial for the sensor nodes in our system, especially since they will be running on batteries.
For this purpose, we dedicate a full lesson to optimizing power consumption on the sensor node devices in the course. For this, we employ a few strategies:
- We will use Nordic Semiconductor’s Power Profiler Kit II (PPK2) to measure our application’s current draw and electric charge consumption.
- This is used alongside nRF Connect for Desktop (and specifically the Power Profiler application included within it).
- After the measurement process, we prioritize the device operations based on electric charge consumption (the higher the consumption, the higher the priority).
- We employ a few strategies to optimize power consumption, including turning off peripherals, adjusting how often operations occur, and adjusting the PAwR timing parameters.
💡Note: The full implementation of this project is available in a free course here.
Video Demo
Course Prerequisites
- [Required] Nordic DevAcademy nRF Connect SDK Fundamentals course
- [Required] Nordic DevAcademy Bluetooth Low Energy Fundamentals course
My Honest Thoughts On The nRF Connect SDK
Even though this is a sponsored course and blog post, you may already know that I’ve been working with Nordic Semiconductor’s solutions and ecosystem long before they sponsored any of my work.
So, I wanted to weigh in with my honest personal opinion on the whole nRF Connect SDK ecosystem:
- Pros
- A comprehensive collection of tools that are well-integrated and streamlined.
- Integrated with Visual Studio Code, which is fast, modern, and user-friendly.
- The availability of third-party modules helps you focus on designing and developing the more important parts of your application rather than reinventing the wheel!
- The solution’s modularity helps you keep your application organized from a source code perspective and makes it easy for teams to collaborate on projects.
- The solution is updated regularly with new features and bug fixes, which gives you confidence that you’re working with a robust and up-to-date ecosystem.
- Cons
- It can have a steep learning curve in the beginning.
- However, it becomes a hard-to-give-up ecosystem once you are past the learning curve and up and running.
- Also, it helps that there are numerous resources available to help make the learning process faster and easier:
So, overall, this is my verdict:
The nRF Connect SDK is a pleasure to work with, and its advantages far outweigh the challenges you may encounter at the beginning of the learning journey. Once you get used to it, you want to keep on using it for every project from thereon!